In a cardiac emergency, seconds feel loud. Someone yells, “Get the AED,” and suddenly a room full of people is watching you, waiting for you to act.
AEDs are designed for everyday people, not just clinicians. They use clear voice prompts, simple diagrams, and step-by-step guidance to help a rescuer move quickly and safely. That guidance only starts once the device is powered on.
The first thing you should do when preparing an AED for use is turn it on, or open the lid if your model powers on automatically. Once it is on, follow the prompts and keep the response moving.
This article walks through what to do next, what to say out loud, and how to avoid the common mistakes that slow defibrillation. You will also see why “ready status” matters long before an emergency ever happens.
The One Step To Remember First
Turning the AED on is not a small detail. It is the moment the device begins coaching the entire rescue.
Some AEDs power on with a button. Others power on when you open the lid. Either way, powering on the AED is the first action because it starts the voice prompts that guide pad placement, rhythm analysis, and shock delivery.
Once the AED is on, you do not need to rely on memory. Your job is to keep the steps moving, keep hands off the person during analysis, and minimize pauses in CPR.
Two Timelines People Often Confuse
A lot of uncertainty comes from mixing two different moments: what happens before the AED arrives and what happens once you have it in your hands.
Both matter, but they are not the same.
What Happens Before The AED Arrives
Before the AED is even in the room, the response should already be in motion.
Make sure the scene is safe. Check for responsiveness and normal breathing. Call 911 or direct someone to call. If the person is unresponsive and not breathing normally, start CPR while someone retrieves the AED.
The AED does not replace these actions. It adds lifesaving power as soon as it arrives.
What Happens Once The AED Is In Your Hands
When the AED arrives, your mindset shifts to speed and clarity.
Turn it on immediately. Expose the chest. Apply pads. Clear for analysis. Shock if advised. Resume CPR fast.
Keeping that sequence in your head helps you avoid the biggest delay: waiting to “get everything perfect” before powering on the device.
The Correct Step Order When Using An AED
This is the flow that keeps most responses fast and safe. The AED will guide you, but it helps to know the shape of the process so you stay calm.
Step 1: Turn The AED On
Press the power button, or open the lid if the model turns on automatically.
Do not wait to prep the chest first. Do not wait for someone else to take over. Powering on the AED starts the voice prompts that keep the entire room aligned.
Step 2: Expose The Chest And Prep The Skin
Pads must stick to bare skin.
Remove clothing from the chest area quickly. If the chest is wet, wipe it where the pads will go. If heavy chest hair prevents good contact, remove hair only in the pad placement areas if you can do it quickly.
Many AED stations include a small responder kit to support quick prep. The goal is not perfection. The goal is firm pad contact without losing time.
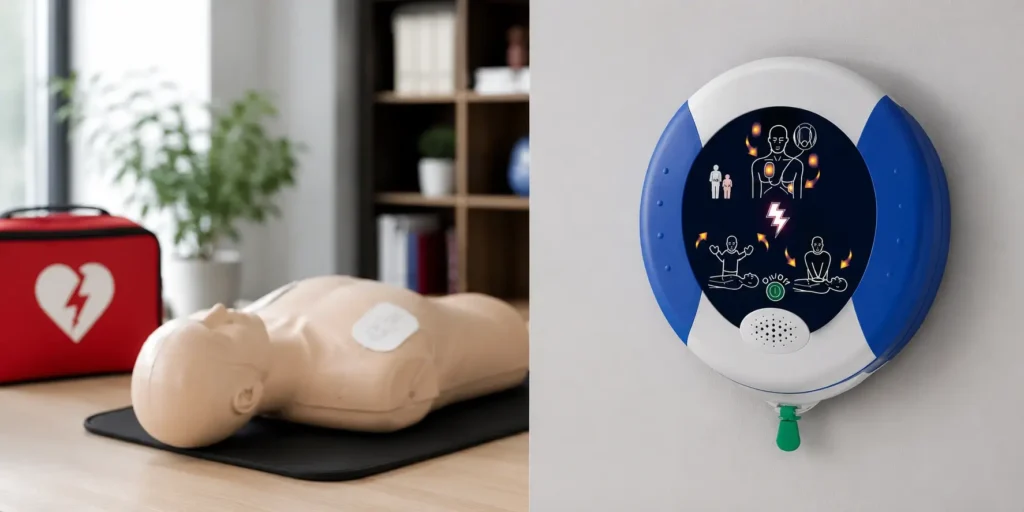
Step 3: Place The Pads Exactly As Shown
Follow the diagrams printed on the pads. The diagrams exist for a reason. People panic, and simple visuals keep the rescue moving.
Common adult placement is one pad on the upper right chest and the other on the lower left side, under the armpit area. Press firmly so the pads adhere well.
Some devices require a pad connector to be plugged in. Others store pads already connected. If a connector is required, connect it as soon as you see it is needed or when the AED prompts you.
Step 4: Clear For Analysis
When the AED says it is analyzing, take the role of leader. You are protecting the accuracy of the rhythm check.
Say it loudly and clearly: “CLEAR. Hands off.”
Make sure no one is touching the person. That includes hands on the chest, shoulders, arms, clothing, or stretcher. Touching during analysis can interfere with rhythm detection and delay the process.
If CPR is in progress, pause only when the AED tells you to pause.
Step 5: Deliver A Shock If Advised
If the AED advises a shock, clear the person again.
Say: “CLEAR. Nobody touch them.”
Some AEDs require you to press a shock button. Others deliver the shock automatically after warning prompts. Follow the device and keep the room focused on safety.
Step 6: Resume CPR Immediately
This is where many responses slow down.
If a shock is delivered, the AED will tell you what to do next. In most cases, that means resuming CPR right away. If the AED says “no shock advised,” you still resume CPR immediately.
A “no shock advised” message means the AED did not detect a shockable rhythm in that moment, so compressions remain critical while the AED continues to guide cycles of CPR and reanalysis.
What Is Most Important While The AED Is Analyzing?
The most important rule during analysis is simple: no one touches the person.
Not the chest. Not the shoulder. Not the arm. Not the clothing. No contact.
A clear script helps keep everyone aligned:
Say: “CLEAR. Hands off. Do not touch.”
Then look around and confirm no one is making contact.
If you are the person doing compressions, be ready to restart as soon as the AED tells you to resume CPR. The goal is brief pauses, not long breaks.
Adult Pad Placement And What To Do If Pads Might Touch
Most of the time, pad placement is straightforward. Use the diagram printed on the pads and keep moving.
A problem can happen on smaller bodies if pads are so close that they might touch each other. If pads touch, the AED may not work as intended.
If pads might touch, your training may recommend an alternate placement that keeps pads separated. The key principle is separation and firm contact.
Pads also expire, and expired pads can compromise adhesion and readiness. Because adhesive and gel degrade over time, AED pads should be replaced after any use and before the expiration date to keep the device in a verified ready state.
Special Situations That Change How You Prep The Chest
Real emergencies are rarely perfect. These situations can slow responders down, so it helps to know what matters most.
Wet Chest Or Heavy Sweat
Wipe the chest quickly where pads will go. Pads do not adhere well to wet skin, and moisture can interfere with contact. The goal is fast, focused drying where the pads will land.
Heavy Chest Hair
Hair can prevent full pad contact. If a razor is available, remove hair in the pad placement areas quickly. If not, place pads firmly as best you can and follow the AED prompts without losing time.
Medication Patches
If there is a medication patch where a pad must go, remove the patch and wipe the area before placing the pad. Pads should not be placed directly over a patch.
Implanted Devices
Some people have a pacemaker or implanted device that creates a visible bump near the upper chest. If a bump is exactly where a pad would go, move the pad slightly away while staying as close to the pad diagram as possible.
Oxygen Nearby
If oxygen is being used, follow your facility protocol and training to reduce fire risk while still delivering rapid defibrillation when needed. Keep the response controlled, minimize delays, and follow the AED prompts.
Using An AED On A Child
Pediatric use should be part of readiness planning, especially in schools, youth sports, community centers, and family venues.
If your AED has pediatric pads or a pediatric mode, use that option when appropriate based on your training and device guidance. Pediatric capability should never be a surprise in the moment.
If pediatric readiness is part of your environment, clear storage and replacement planning matter. Many programs treat pediatric supplies as secondary and then discover they are missing or expired during an inspection.
Common Mistakes That Slow Down AED Use
Most delays happen for predictable reasons. The goal is to remove hesitation and keep the process simple.
People often delay powering on the AED because they think the chest must be prepped first. Others stop CPR too long while trying to do everything perfectly. Some forget to clear during analysis, which forces repeated analysis cycles. Others remove pads after “no shock advised,” which breaks the flow of reanalysis and prompts.
Location delays are also common. If people cannot find the AED quickly, the device may exist but still arrive too late to help. In large facilities, AED signage that includes cabinet identification and directional arrows reduces wasted seconds by guiding someone directly to the device without asking for directions.
Making AED Response Faster Before An Emergency Happens
The fastest AED response is created weeks before the emergency, not during it.
This is where “ready status” matters. An AED should always show a clear ready indicator. Pads and batteries must be in date. The cabinet must be accessible. The location must be obvious. Your people need training that matches your environment.
A reliable program avoids waiting for warnings because AED batteries typically need scheduled replacement based on install date and expiration date to prevent unexpected downtime and last-minute scrambling.
Most preventable failures come from missed checks, which is why AED maintenance should include routine readiness inspections and documented replacement tracking rather than relying on memory or hoping someone notices an expired component.
When a device is beeping or shows a red indicator, it is signaling that readiness is compromised. An AED that is beeping is usually signaling a readiness issue such as expired pads, a low battery, or a self-test fault that needs to be corrected immediately.
Life Support Systems In A Real Program Context
Emergency readiness is more than owning equipment. It has a system that works under pressure.
Life Support Systems supports organizations nationwide with programs built around equipment, on-site service, and training. Since 1977, the focus has remained consistent: help teams respond effectively when a medical emergency happens, not just place devices on walls.
That means keeping AEDs in ready status, keeping pads and batteries current, confirming accessibility and signage, and training responders so the first step and the next steps become automatic under stress.
The key difference between an AED and a manual defibrillator is that an AED guides lay responders through the process, which makes readiness and placement planning especially important in workplaces and public settings.
Next Step
If you manage an AED program, the question is not whether the AED is installed. The question is whether someone can find it quickly and whether it will power on and guide them without delay.
If you want help reviewing readiness across your facility or multiple locations, request an AED program check. A short consult can confirm placement, signage, ready status practices, and replacement planning so your AEDs are not only present but also rescue-ready.
FAQs
What Is The First Step To Prepare The AED For Use?
Turn the AED on, or open the lid if the AED powers on automatically. Then follow the voice prompts.
What Is The First Thing You Do With An AED When Using It?
Power it on immediately. The prompts begin once the AED is on, and they guide the remaining steps.
What Is The Correct Order Of Steps When Using An AED?
Turn it on, expose and prep the chest, apply pads, clear for analysis, shock if advised, then resume CPR immediately.
When Using An AED, What Is Very Important To Do While It Is Analyzing?
Make sure no one is touching the person. Say “CLEAR” and visually confirm hands off before analysis continues.
Which Instruction Should You Give Everyone During Analysis?
Say “CLEAR. Hands off.” Then confirm no one is making contact with the person.
When Preparing To Deliver A Shock With An AED, What Should You Do First?
Make sure everyone is clear of the person and not touching them. Then follow the AED prompt to press shock or allow automatic shock delivery.
If The AED Says “No Shock Advised,” What Should The Rescuer Do?
Resume CPR immediately and keep the pads in place. Follow the AED prompts for reanalysis and continued cycles.
When Placing AED Pads On An Adult, Where Should They Go?
Follow the pad diagrams. Common placement is the upper right chest and the lower left side under the armpit area.
What Should You Do If The Person’s Chest Is Wet?
Wipe the chest quickly where the pads will go so they adhere properly.
What Is The Most Common Reason AED Use Gets Delayed?
Hesitation, unclear AED location, delaying power-on, and long pauses in CPR are common causes of delay.
Last updated on 3 days ago