Mounting an AED is not just a facility task—it’s a readiness decision. A defibrillator that is hard to see, hard to reach, or hard to access can cost precious time during sudden cardiac arrest. The goal is simple: when someone needs the AED, it should be obvious where it is, easy to remove, and immediately ready to guide a rescue.
This guide explains how to mount an AED in a way that supports fast response, accessibility, and ongoing “ready status.” We’ll cover location planning, height considerations, cabinet options, basic mounting steps for common wall types, and what to check after installation so the device stays rescue-ready over time.
The 5 Rules Of A Proper AED Mount
A good AED mount follows a few core rules that apply in almost every facility. These rules help reduce confusion and protect your response time when the pressure is on.
If you do nothing else, anchor your plan to these five:
- Choose a central, high-visibility location where people naturally pass through.
- Mount at an accessible height so a wide range of users can reach and remove the AED quickly.
- Secure the cabinet or bracket to the correct wall structure with the right fasteners.
- Make the AED easy to find with clear signage above the unit and directionals where needed.
- Verify “ready status” immediately after installation—and keep it ready with routine checks.
Choose The Right Location First
Before you pick up a drill, treat mounting as a placement decision. The best cabinet in the world won’t help if it’s mounted where nobody can find it quickly, or where access is blocked during normal business operations.
A strong placement decision balances visibility, access, and speed.
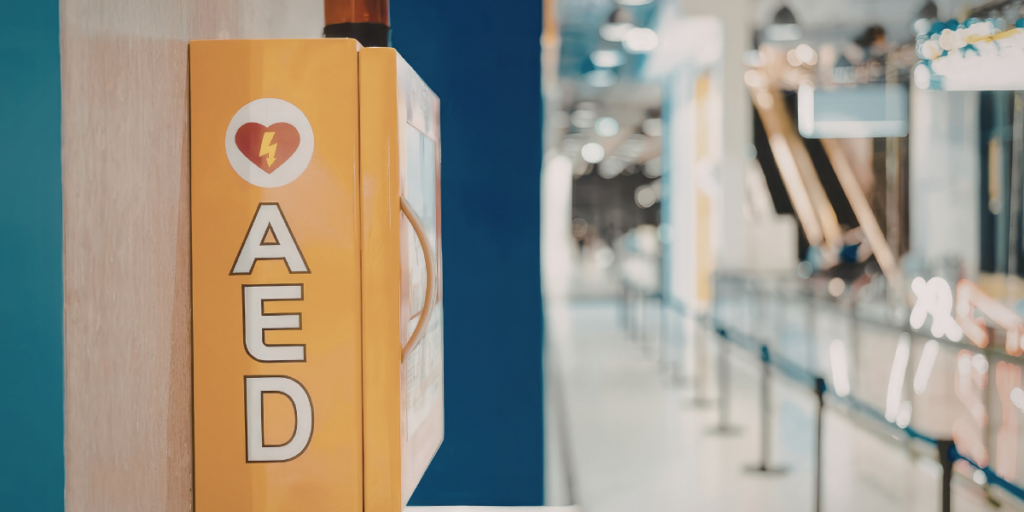
Prioritise Visibility And High-Traffic Zones
Place AEDs where people can describe the location quickly and where foot traffic is steady. In many buildings, the best options are main corridors, lobbies, reception areas, cafeterias, gyms, and large common spaces.
Avoid “hidden safety storage” thinking. AEDs are not like spare supplies that can sit in an office. They are emergency response equipment, and visibility is a feature, not a risk.
Plan For Fast Retrieval With A Simple Walk Test
Once you select a candidate location, do a walk test. Start from the areas where an event could realistically occur—meeting rooms, gym floors, classrooms, production areas, break rooms—and time how long it takes to retrieve the AED and return.
If the route includes confusion, long detours, or locked doors, reconsider the placement. Your goal is to minimise the time between collapse and defibrillation, and mounting choices directly influence that timeline.
Avoid Locations That Create Delays
Certain locations consistently cause problems in real emergencies. The AED may be in the building, but it’s functionally unavailable because access is unclear or restricted.
Avoid mounting an AED:
- Inside a locked office or behind a counter
- In a room that closes after hours
- Behind doors that are often propped open and block visibility
- Near clutter or movable furniture that gradually obstructs access
A “perfect” location is one that remains accessible and visible all day, every day—not only during ideal conditions.
Mounting Height And Accessibility Considerations
Mounting height affects speed and usability. If the AED is too high, responders struggle to remove it quickly. If it’s too low, it can be blocked or overlooked. The goal is a height that supports fast removal and broad accessibility.
This is also where many facilities unintentionally create compliance and safety issues.
The Common 48-Inch Planning Target
You will often see 48 inches referenced as a practical planning target for accessibility, particularly related to reach and cabinet placement considerations.
Many organisations aim for the bottom of the cabinet around this range so the AED is within comfortable reach for most adults and can be accessed quickly.
The best approach is to follow local code guidance for your facility type and ensure the AED can be removed without strain.
If your cabinet has a handle or latch, test it at the planned height before final mounting. The goal is simple: responders should not have to reach awkwardly or fight gravity to retrieve the AED.
Don’t Overlook Corridor Protrusion And Clearance
In hallways and corridors, wall-mounted objects can create accessibility hazards if they protrude too far into the walking path. This is a common reason facilities choose recessed or semi-recessed cabinets in narrower hallways.
If you’re mounting in a corridor, consider how far the cabinet extends into the space and whether it creates an obstacle for people moving through the area. In tight or high-traffic corridors, recessed mounting can help you maintain visibility without creating a walkway problem.
Make One-Hand Removal Possible
In a real emergency, a rescuer may be holding a phone, guiding others, or supporting a victim while retrieving the AED. Your setup should allow someone to open the cabinet and remove the AED smoothly—ideally without needing two hands and without wrestling with awkward latches.
When you evaluate height and cabinet style, test it as if you were in a hurry. If it feels “fussy,” it will feel worse under pressure.
Pick The Right Mounting Setup
AED mounting is not one-size-fits-all. Your facility layout, hallway width, risk of tampering, and whether the AED needs to be moved sometimes will influence the best setup.
Choosing the right cabinet or bracket is about balancing visibility, security, and immediate access.
Surface-Mount Cabinet Vs Recessed Cabinet Vs Wall Bracket
A surface-mount cabinet is the most common option and works well in open areas with enough wall clearance. It’s visible and straightforward to install.
A recessed cabinet is often ideal for corridors and narrow passageways, especially when you want to reduce protrusion while keeping the AED clearly marked.
A wall bracket can be appropriate for certain controlled environments where the AED is kept in a supervised space or where a cabinet isn’t necessary. If you use a bracket, signage becomes even more important so the device is clearly identified as an AED.
Alarmed Cabinet Vs Locked Cabinet
If security is a concern, an alarmed cabinet is usually the safer option than a locked cabinet. An alarm can deter tampering while still allowing immediate access when the AED is needed.
Locked cabinets can fail in real emergencies. Keys get misplaced, codes aren’t shared, and access becomes uncertain when seconds matter. An AED should never be “available only if the right person is present.”
Indoor Vs Outdoor Mounting
Outdoor AED installations require careful planning. You need an appropriate outdoor-rated cabinet, clear visibility, and an environment that won’t destroy batteries and pads prematurely.
If you’re considering outdoor mounting, evaluate temperature extremes, humidity, vandalism risk, and whether you can keep the unit accessible year-round. Outdoor placement can be effective, but it must be designed for the real environment—not just mounted and hoped for.
Tools And Hardware You’ll Typically Need
Mounting an AED is not complicated, but it must be done safely and correctly. Using the wrong fasteners or mounting into weak material can create long-term issues, including cabinet failure.
Before you start, confirm you have the correct tools for your wall type.
Basic Tools
Most installations require a tape measure, level, drill, appropriate drill bits, a pencil or marker, and safety glasses. If you’re mounting into masonry, a hammer drill and masonry bit are often needed.
If your cabinet is large or heavy, plan for a two-person install. It makes alignment easier and reduces the risk of shifting during mounting.
Fasteners By Wall Type
For drywall installations, mounting into studs provides the most secure support. If studs don’t align with your cabinet holes, use rated anchors that match the cabinet’s weight and the wall material.
For concrete, brick, or block walls, use appropriate masonry anchors designed for the cabinet load, and pre-drill with the correct bit.
The goal is not just “it stays up today.” The goal is stable, secure mounting for years.
Safety Check Before Drilling
Avoid drilling near outlets, switches, thermostats, or areas where wiring may run. If you’re unsure, consult a facilities professional. A clean AED install should not introduce electrical or structural risk into your wall.
Step-By-Step: How To Mount An AED Cabinet
A smooth installation is one that’s measured, level, secure, and finished with readiness verification. You don’t need to overcomplicate it, but you do need to complete the full process.
Step 1: Confirm Height And Mark Your Mount Points
Measure from the floor, confirm the cabinet height target, and mark your mounting points. Use a level before drilling so the cabinet sits straight and looks professional.
Also consider door swing and approach paths. If the cabinet door opens into a corridor, make sure it won’t create a traffic hazard when opened.
Step 2: Locate Studs Or Select Proper Anchors
If mounting on drywall, locate studs with a stud finder and align mounting holes with studs whenever possible. If not possible, use rated anchors that match your cabinet weight and wall type.
For masonry walls, mark and pre-drill accurately. Rushed drilling often leads to misalignment that can weaken the final installation.
Step 3: Pre-Drill, Level, And Secure The Cabinet
Pre-drill the holes, then secure the cabinet while keeping it level. Tighten fasteners evenly and confirm the cabinet doesn’t shift or wobble.
After mounting, apply a firm pull test to ensure the cabinet feels solid. The cabinet should not flex under normal handling.
Step 4: Place The AED Inside And Test The Cabinet Alarm
Install the AED, confirm it sits correctly, and close the cabinet.
If the cabinet has an alarm, test it with the provided key or reset mechanism. Make sure staff know how it functions so a false alarm doesn’t lead to the alarm being disabled.
Step 5: Confirm The AED Shows “Ready”
This is the most important step. The install isn’t complete until the AED shows it is rescue-ready.
Confirm the “ready” indicator is active, and there are no warning beeps. If the AED shows “not ready,” check pad connection and expiration dates, confirm the battery condition, and resolve the issue immediately. Mounting an AED that isn’t ready creates a false sense of safety.
Signage And Wayfinding After Mounting
Mounting the AED is not the finish line. It must be discoverable by someone who has never been to your building before, under stress, without asking for directions.
This is where signage turns a mounted AED into a usable AED.
Put A High-Visibility Sign Above The AED
Place a clear AED sign directly above the cabinet. In larger facilities, projecting or 3D signage can help people spot the AED from down the hallway or from side angles.
Keep signage consistent. The same symbol, colors, and wording should appear anywhere you guide people to the AED.
Add Directional Signs At Decision Points
Directional signs should go where someone might hesitate: hallway turns, elevator lobbies, stairwell exits, and corridor intersections.
If the route includes more than one turn, use repeated signs. People need reassurance that they are still going the right way.
Build Entrance Awareness
In public-facing facilities, add entrance decals or notices that indicate an AED is available. This improves awareness and can speed response because people know an AED exists before an emergency occurs.
Register And Document The AED Location
A mounted AED should be documented and mapped. This is especially important for multi-site organizations, large campuses, and facilities with rotating staff.
Create internal documentation that includes the AED location, floor, and nearby landmarks. Share this information with staff and include it in safety communications. If your area supports AED registry systems or local responder notification programs, registering the AED may improve awareness for emergency response coordination.
Even if you don’t register externally, internal documentation should always be current. If you move the AED even a few feet, update the records and signage.
After Installation: Keep The AED Rescue-Ready
AED readiness is not a one-time achievement. It’s a maintained state.
Once your AED is mounted, put a simple rhythm in place that protects your “ready status” over time.
Monthly Visual Checks
A monthly check takes minutes and prevents the most common readiness failures. Confirm the AED shows “ready,” the cabinet is accessible, pads and battery are within date, and the area is free of obstructions.
If your AED is in a high-traffic area, checks may need to happen more often. The goal is not paperwork—it’s confidence that the device will work immediately.
Post-Use Reset
After any AED use, the device must be returned to service properly. Replace pads immediately, evaluate the battery, confirm the unit returns to “ready,” and document the event.
A rescue is not the end of the story. The AED should be back in a rescue-ready state as quickly as possible.
Common Mounting Mistakes That Slow Response
Most AED mounting issues are preventable. They happen when mounting is treated like a facilities task instead of an emergency readiness decision.
Mounting mistakes that commonly slow response include installing the AED too high, placing it where people can’t see it, allowing cabinets to protrude into tight hallways, locking the cabinet, skipping directional signage, or failing to confirm the AED is actually ready after installation.
The safest approach is to mount, mark, test, and verify readiness as a complete process—not a set of separate tasks.
How Life Support Systems Helps With AED Mounting
Mounting is one part of a successful AED program. The bigger goal is a system your organization can trust: the right equipment, installed correctly, clearly marked, maintained consistently, and backed by training that matches your environment.
Life Support Systems supports organizations nationwide with AED equipment, placement planning, cabinet and signage guidance, on-site service and inspections, readiness tracking, and training. Whether you’re installing one AED or standardizing a program across multiple locations, our focus is the same: keep your devices visible, accessible, and rescue-ready.
Clean, consultative next step
If you’re planning a new AED installation or reviewing existing placements, request an AED mounting and readiness review. We’ll help you confirm the best locations, proper mounting approach, signage needs, and post-install readiness checks—so your AED program is not just installed, but truly ready when it matters.
FAQs
How high should an AED be mounted?
Many facilities plan mounting height to keep the AED accessible for a wide range of users. A commonly cited target is around 48 inches from the floor to the bottom of the cabinet, but your best approach is to follow local guidance and verify practical reach and fast removal.
Where is the best place to mount an AED in a building?
Mount AEDs in central, high-visibility, high-traffic areas such as lobbies, main corridors, reception areas, gyms, cafeterias, and near large gathering spaces. Avoid locked or hidden rooms.
Can an AED cabinet protrude into a hallway?
In narrow corridors, protrusion can create accessibility and safety issues. In those cases, recessed or semi-recessed cabinets may be a better choice while still keeping the AED clearly marked.
Should I use an alarmed cabinet or a locked cabinet?
Alarmed cabinets deter tampering while preserving immediate access. Locked cabinets can delay response when keys or codes aren’t available, which is why many programs avoid locking AEDs.
How do I mount an AED cabinet on drywall safely?
Whenever possible, mount into studs. If studs don’t align, use rated anchors appropriate for the cabinet weight and wall type, and confirm the cabinet is stable after mounting.
What anchors should I use for concrete or brick?
Use masonry-rated anchors and the correct drill bit. Pre-drill carefully and confirm the cabinet is secure and level after installation.
Do I need signage when I mount an AED?
Yes. A sign above the AED and directional signage at decision points makes the AED easier to find during an emergency and reduces response time.
Should I register my AED location?
If your area supports AED registration or local responder notification programs, registration may improve emergency response coordination. At a minimum, document and map the AED location internally.
What should I check after mounting to confirm the AED is ready?
Confirm the AED shows a clear “ready” indicator, there are no warning beeps, pads and battery are within date, and the cabinet is accessible and unobstructed.
Can I mount an AED outdoors?
Yes, with an outdoor-rated cabinet designed for weather and temperature conditions. Outdoor mounting should be planned carefully to protect the AED and maintain readiness year-round.
Last updated on 3 days ago